Paul C's Blog

To be funny,to grow up!

0%

wslubuntu的cuda安装

0.(可选)NVIDA官方下载对应驱动

选择界面:https://developer.nvidia.com/cuda-downloads

cuda_12.1.0_531.14_windows.exe

下载后双击安装,等待安装成功;查看当前的cuda驱动版本。

1
2
C:\Users\22154>nvidia-smi
CUDA Version: 12.1 |

1.安装cuda

WSL-Ubuntu-cuda下载,注意cuda版本和之前Windows上的对齐

1
2
3
4
5
6
7
8
wget https://developer.download.nvidia.com/compute/cuda/repos/wsl-ubuntu/x86_64/cuda-wsl-ubuntu.pin
sudo mv cuda-wsl-ubuntu.pin /etc/apt/preferences.d/cuda-repository-pin-600
wget https://developer.download.nvidia.com/compute/cuda/12.1.1/local_installers/cuda-repo-wsl-ubuntu-12-1-local_12.1.1-1_amd64.deb
sudo dpkg -i cuda-repo-wsl-ubuntu-12-1-local_12.1.1-1_amd64.deb
sudo cp /var/cuda-repo-wsl-ubuntu-12-1-local/cuda-*-keyring.gpg /usr/share/keyrings/
sudo apt-get update
sudo apt --fix-broken install
sudo apt-get -y install cuda

2.安装conda并新建环境

1
conda create -n tf2.9 python=3.10

3、激活环境

1
conda activate tf2.9

4.安装Pytorch

https://pytorch.org/get-started/locally/

1700483321638

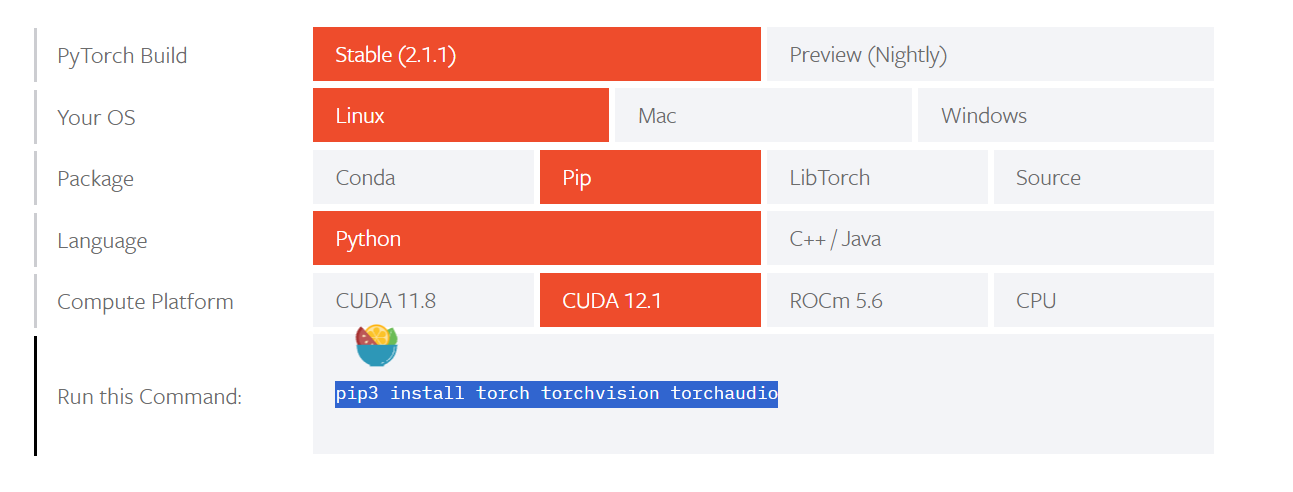
复制粘贴上面的命令去Linux下运行即可。

···

1
pip3 install torch torchvision torchaudio

5.下载 tensorflow_gpu-2.9.0 (根据需求选择)

命令行打开到Computed-Tomography-AI目录,执行下面的命令。

1
2
(tf2.9) D:\DataSet\Github\Computed-Tomography-AI>
pip3 install -i http://pypi.douban.com/simple/ -r requirements.txt --trusted-host pypi.douban.com

安装其他版本,可以去 tf官网查看tensorflow、python、tensorflow-gpui、cuda、cudnn的对应关系 。

6.在对应环境中安装CUDAToolkit

6.1conda挂代理或者换源

在这里进行换源,加速下载:

1
2
3
4
conda config --add channels https://mirrors.tuna.tsinghua.edu.cn/anaconda/cloud/msys2/
conda config --add channels https://mirrors.tuna.tsinghua.edu.cn/anaconda/cloud/conda-forge
conda config --add channels https://mirrors.tuna.tsinghua.edu.cn/anaconda/pkgs/free/
conda config --set show_channel_urls yes

6.2 conda下载cudatoolkit

1
conda install cudatoolkit=11.2

7.conda下载CuDnn

1
conda install cudnn=8.1

8.(可选)手动下载CudaToolKIt和CuDnn

https://anaconda.org/conda-forge/cudatoolkit/11.2.2/download/win-64/cudatoolkit-11.2.2-h933977f_9.tar.bz2

1
conda install --use-local cudatoolkit-11.2.2-h933977f_9.tar.bz2

9.验证是否安装成功

命令行下

1
2
3
4
5
6
py310paulc@BlackGame:~$ python
Python 3.10.13 (main, Sep 11 2023, 13:44:35) [GCC 11.2.0] on linux
Type "help", "copyright", "credits" or "license" for more information.
>>> import torch
>>> torch.cuda.is_available()
True

或者

1
2
3
4
(tf2.9) D:\DataSet\Github\Computed-Tomography-AI>python
>>>import tensorflow as tf
>>>tf.test.is_gpu_available()

1678380947188

返回true说明没有问题。

现在,所有的依赖项已经下载并配置成功。

安装pwndbg

Ubuntu18会缺少各种依赖,直接用它编译好的最快。

1
2
https://github.com/pwndbg/pwndbg/releases/download/2023.07.17-pkgs/pwndbg_2023.07.17_amd64.deb
sudo dpkg -i pwndbg_2023.07.17_amd64.deb